Managing rentals
Before you can rent a vehicle, you must first add it to the database. You can do this on the Vehicles page, if you haven't done it already.
There are several ways to create a new rental: use the New Rental button in the Quick Menu, or the same button on the right side of the Rentals page. If you create a rental as described above, the rental time will be from 9:00 am to 5:00 pm of the current day, but if you click on an empty field in the calendar where there is no rental, a New Rental button will pop up, and when you click on it, the system will automatically fill in the vehicle and the rental time will also be from 9:00 am to 5:00 pm of the current day.
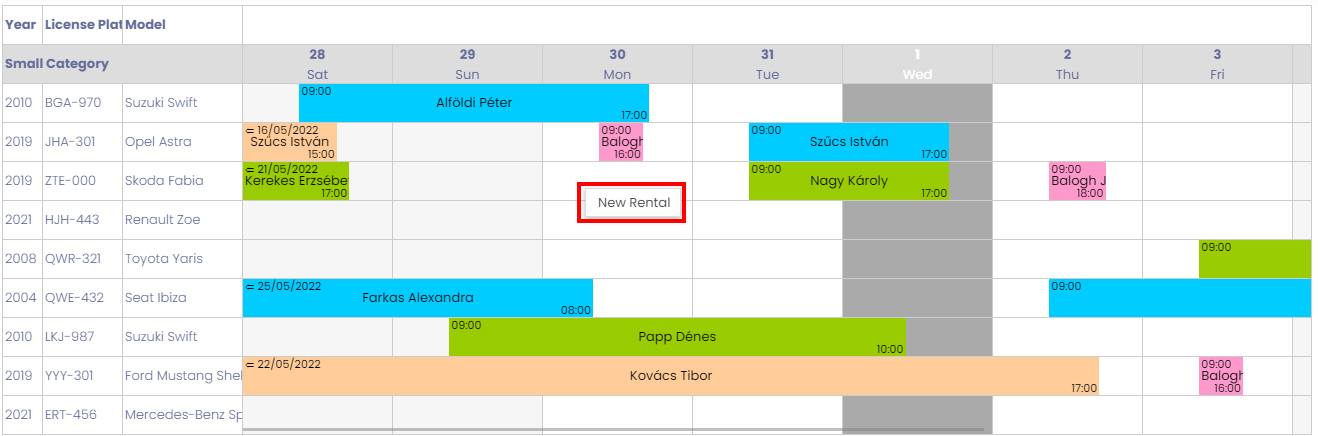
In the example shown above, we want to rent out the Renault Zoe on Wednesday the 22nd, so when we open the new rental, this car will automatically be set for the Vehicle field, and Wednesday the 22nd from 9am to 5pm will be automatically set in the From and To fields. These values may be modified, but this approach makes it easier for us.
There are four tabs on the rental page:
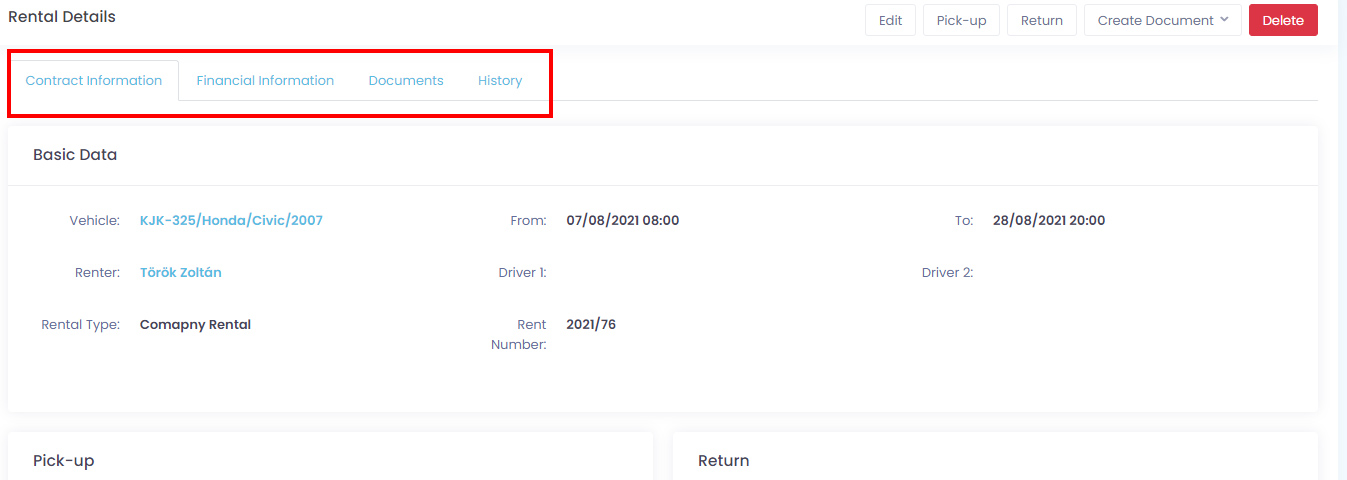
Contract information
In the basic data section, you can set the main parameters of the rental. Most of the fields here are mandatory. Entering the rental period is useful but not mandatory. In case you do not enter the rental time, the rental will not be visible in the calendar view, only in the list view.
If you have started a new rental from the calendar, the vehicle from which you started the rental will be filled in the Vehicle field. If you started from another location, you can select it from a drop-down list. If you start typing in one or more pieces of information about the vehicle, the list will automatically be filtered by the values you have entered.
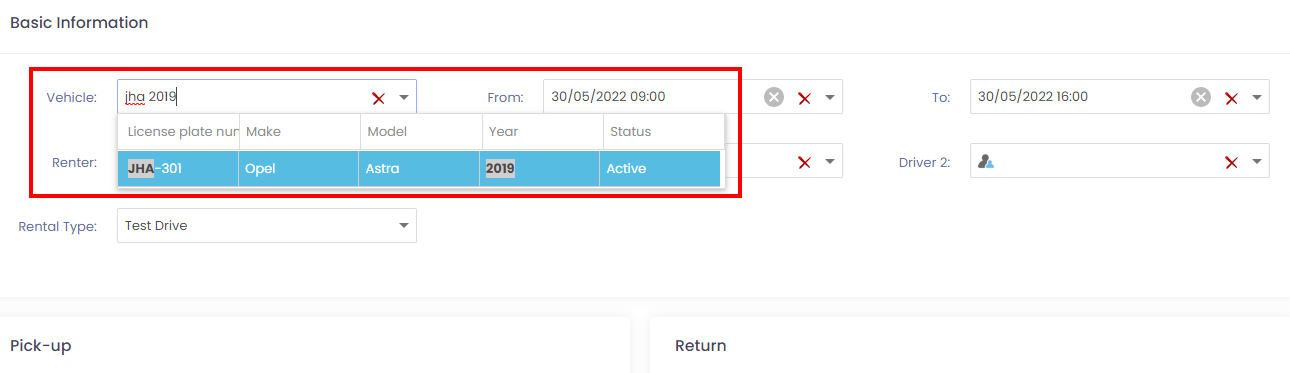
- The rental time is automatically set by the system to the current day from 9:00 am to 5:00 pm. This can be modified manually, by selecting the day from the calendar and providing the hours and minutes.
- You can choose a Customer and additional Drivers from the existing
customer list. If the client is not yet in the system, you can add one by clicking on the human figure
 icon. If you start typing in one or more details of the customer, the list will automatically be filtered by the values you have entered.

- Category defines the color of the rental in the calendar view. You can change this or add a new one in the Settings page under Rental Types.
In the Pick-up and Returns section, you can enter information about the pick-up and return of the car, but you can provide these details later as well.
- In the Hands over and Returns fields, you can specify the colleagues who will be responsible for the pick-up or return. You can add a new colleague on the Users page. For this colleague, the daily tasks will include the pick-up and return as a to-do.
- In the Where To and Where From fields, you can specify the location of the pick-up and return.
- The data entered in the odometer field will indicate the vehicle's odometer reading, which you can also find on the vehicle's data sheet and in the service list.
- Fee fields allow you to specify the delivery and return fee, if applicable.
- In the Damage and Photos section, you can enter textual information about any damage you have inspected during pick-up and return, and upload photos.
Rental prices section
- In the Currency field you can select the currency of the rental contract. You can add a new currency in the Currencies menu on the Settings page.
- You can enter the exchange rate in the Exchange rate field.
- In the rental fee field you can enter the rental fee. If you have entered a rental fee on the vehicle's data sheet, the system will automatically calculate the rental fee based on that value, the currency and the rental period, but you can change this manually at any time.
- In the Deposit amount field, you can enter the amount of the deposit.
- In the Payment method field, you can specify the payment method and the timing of the payment. You can add a new payment method in the Payment method and Payment method timings menu on the Settings page.
In the Overruns section, you can specify the amount of the mileage overrun and the charges for it.
In the accessories section, you can add accessories to your rental by ticking the checkboxes. These all come from the product list and can be modified there, but you also need to add the item to the vehicle you want to rent, which can be done on the vehicle data sheet.
If you have specified custom fields for rentals, they may appear in the Custom fields section at the bottom of the page. You can configure these fields in the Custom Fields (Rental) menu on the Settings page.
Financial details
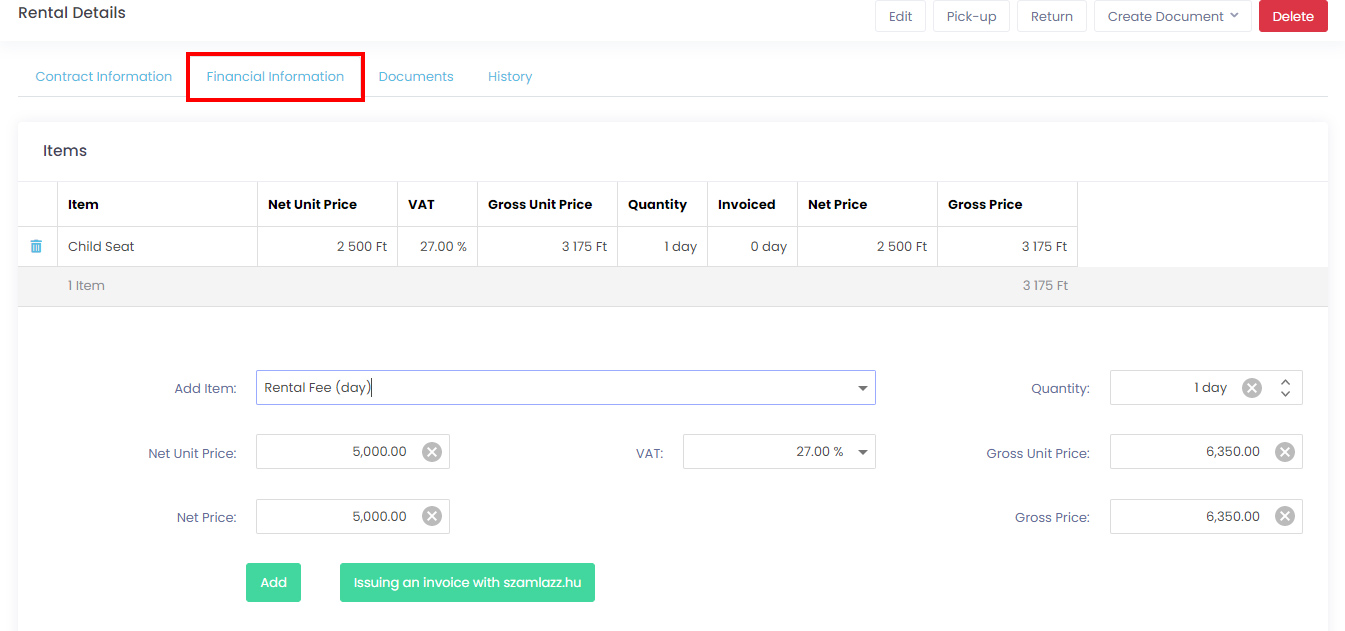
In the Items section, you can add various items to the rental. To add an item, select what you want to add from the drop-down list. The items in the list can be added to the database in the product list. Once you have selected the item you need, the system will automatically fill in the fields for you depending on the values you have entered in the product list, but you can also modify them. Set the quantity and add it to the Items with the Add button. You can delete items from the list by clicking on the bin ![]() icon next to them.
icon next to them.
The Issue Invoice button allows you to invoice the customer for items that have been added but not yet invoiced. To do this, you need to enter the necessary credentials to be able to connect to the invoicing program in the integration settings. Clicking on the Issue Invoice button will bring up a dialog box with the fields required to issue the invoice. In the items section you can see the items that have not yet been invoiced. In the quantity field, you can specify how many items you want to invoice. By default, the field is set to the maximum number of items that can be invoiced, but you can modify this. Items with zero in the quantity field will not be invoiced. Once the fields have been filled in, you can click on the Issue Invoice button at the bottom of the sheet to issue the invoice and it will be displayed in the Invoices section.
For payments, you can enter the amount of the payment, how it was made and the date it was made. You can edit the payment methods in the Payment methods and timings menu on the Settings page. You can delete items from the list by clicking on the bin ![]() icon next to them.
icon next to them.
You can see the total of the items and the amount of the payments in the total section. The system calculates a balance for you from these.
In the Invoices section, you can see the invoices issued so far, which you can download by clicking on the download ![]() icon and send to the customer via email by clicking on the send
icon and send to the customer via email by clicking on the send ![]() icon.
icon.
Documents
Here you can find all the documents related to the rental.
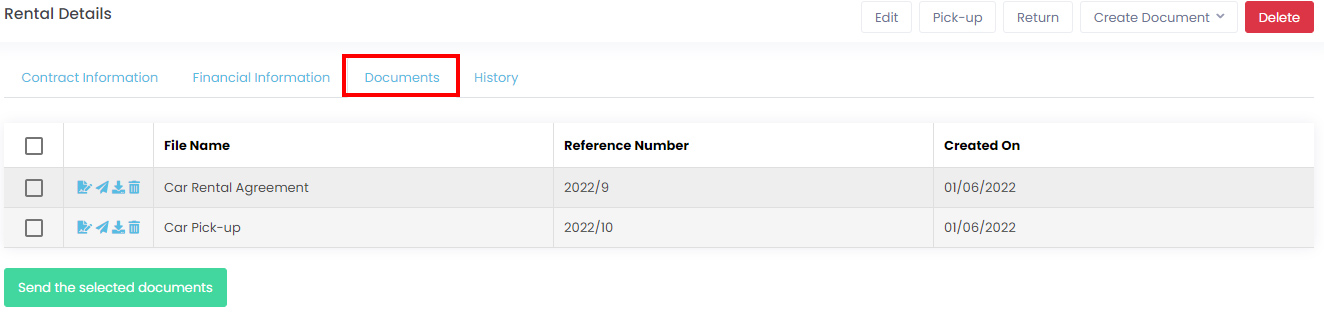
By clicking on the send ![]() icon in the first column of the list, you can send the document to the customer if they have a valid email address. With the download
icon in the first column of the list, you can send the document to the customer if they have a valid email address. With the download ![]() icon you can download the document in PDF format. Click on the bin
icon you can download the document in PDF format. Click on the bin ![]() icon to delete the document. If the document template has a signature spot and has not yet been signed, you can do this with the sign
icon to delete the document. If the document template has a signature spot and has not yet been signed, you can do this with the sign ![]() icon.
icon.
By clicking on the row of the document, you can open it.
You can create a document by clicking the Create Document button on the right. From the drop-down menu, select the document template you want to use. If you don't have any, you can create a new one in the Document templates menu. Clicking on the selected template will bring up a text editor.
History
The operations related to the rental are logged in this list.
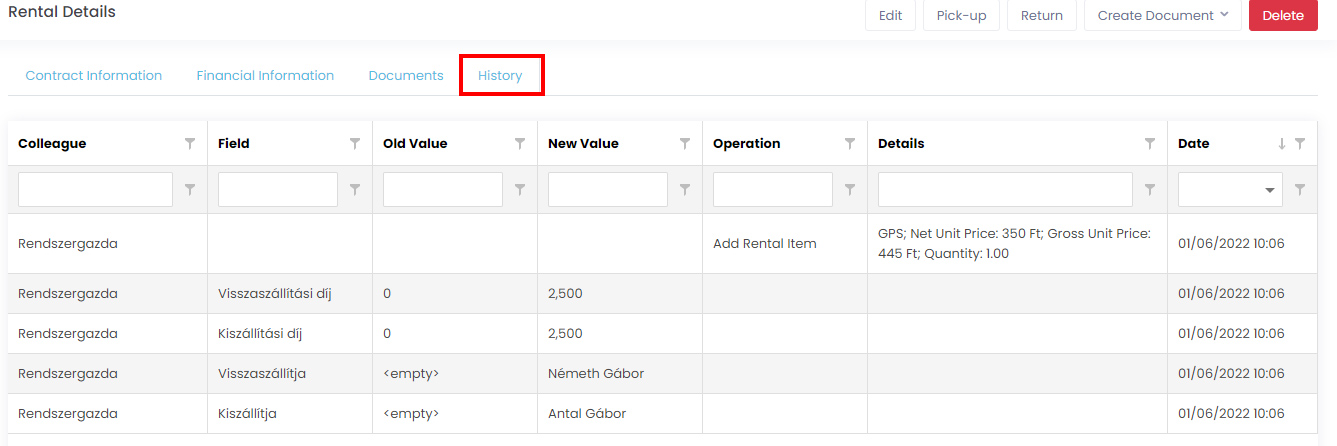
In the list, you can see the operations, for example, if you have added or deleted an item, along with the logtime of the operation. You can also check here whether the status of a particular rental has been changed in the Tasks menu.